Picture this: you’re cruising down the road, enjoying the wind in your hair and the freedom of the open road. But suddenly, *crack*! A small pebble collides with your windshield, leaving behind a spiderweb-like pattern of damage. Now what? Do you ignore it and hope for the best? Or do you take action to fix it before it becomes a bigger problem?
In this blog post, we’ll dive into everything you need to know before attempting windshield repair. From understanding the importance of fixing a damaged windshield to weighing DIY versus professional repair services, we’ve got you covered. So buckle up and get ready to learn how to keep your view crystal clear while on those adventurous drives!
The Importance of Fixing a Damaged Windshield
Your windshield does so much more than just provide you with a clear view of the road ahead. It plays a crucial role in your vehicle’s structural integrity, acting as a support for the roof and protecting you in case of an accident.
When your windshield gets damaged, even if it seems like a minor chip or crack, it can compromise its strength and safety features. Over time, that seemingly harmless damage can spread and weaken the entire structure. This is why fixing a damaged windshield should never be taken lightly.
Not only does repairing your windshield ensure your safety on the road, but it also saves you money in the long run. Ignoring small chips or cracks may seem convenient at first, but they have a tendency to grow larger over time – especially when exposed to drastic temperature changes or rough roads.
But let’s not forget about visibility! A cracked windshield can obstruct your view while driving, causing distractions and increasing the risk of accidents. Plus, if law enforcement catches wind of extensive damage to your windshield during routine checks or inspections, you could face fines or penalties.
So remember: don’t underestimate the importance of fixing that damaged windshield. It’s not just about aesthetics; it’s about staying safe on the road and ensuring optimal performance from one of your vehicle’s most essential components
DIY vs Professional Repair Services
When it comes to repairing a damaged windshield, one of the first decisions you’ll need to make is whether to attempt the repair yourself or seek professional help. Both options have their pros and cons, so it’s important to weigh them carefully before making a choice.
DIY windshield repair can be enticing for those who enjoy tackling projects on their own. It allows you to save money and gives you a sense of accomplishment. Plus, there are many DIY kits available on the market that claim to provide everything you need for a successful repair.
However, it’s important to consider your level of experience and expertise before attempting DIY repairs. While some minor chips or cracks may be fixable with an at-home kit, more serious damage can require specialized tools and skills that only professionals possess.
Professional windshield repair services have their advantages as well. Certified technicians are trained in proper techniques and have access to high-quality materials that may not be readily available to consumers. They also often offer warranties on their work, providing peace of mind in case any issues arise down the line.
The decision between DIY and professional repair will depend on factors such as your comfort level with DIY projects, the severity of the damage, and your budget. It’s always a good idea to consult with professionals if you’re unsure about how best to proceed.
Remember: Safety should always be your top priority when dealing with windshield damage. If you don’t feel confident in your abilities or if the damage is extensive, don’t hesitate to reach out for professional assistance – they’ll ensure that your windshield is repaired properly and safely.
Types of Windshield Damage and Their Repair Options
When it comes to windshield damage, there are several types that can occur. Each type requires a different approach to repair, so understanding the options available is essential.
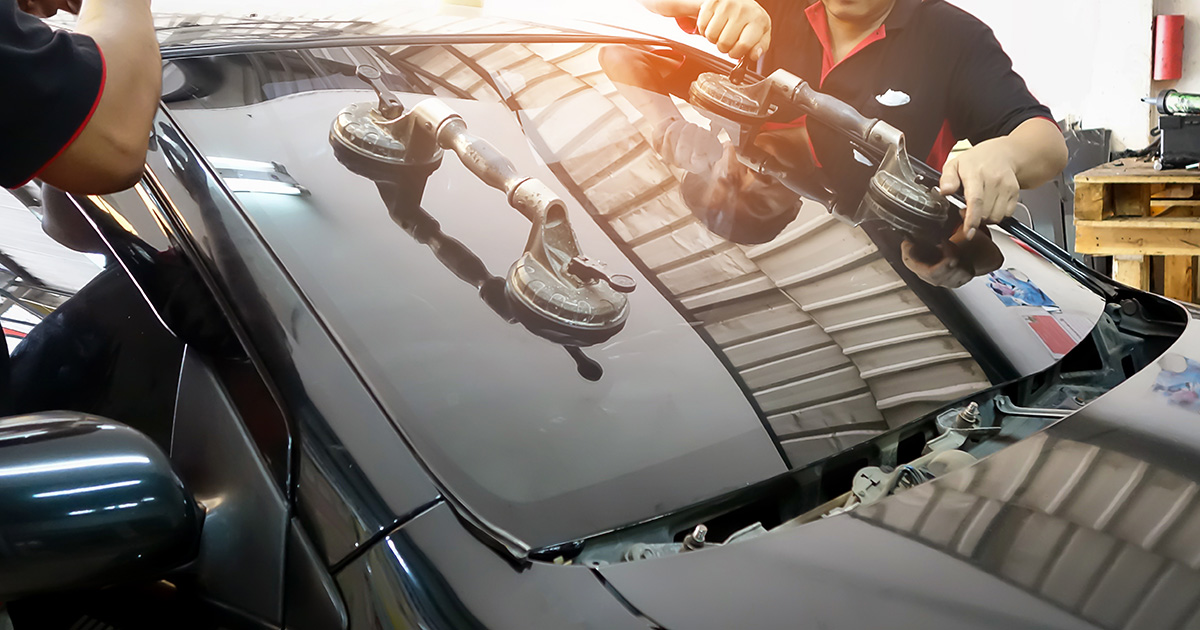
One common type of damage is a chip or crack. These can be caused by flying debris from the road or even temperature changes. Small chips can often be repaired with resin injection techniques. The process involves injecting a specialized resin into the damaged area, which fills in the gap and prevents further spreading.
For larger cracks or more severe damage, replacement may be necessary. Cracks longer than three inches typically cannot be effectively repaired and require complete replacement of the windshield.
Another type of damage is known as “bullseye” damage, which appears as a circular shape with concentric rings around it. This type of damage can usually be repaired using resin injection methods as well.
Additionally, there may be star-shaped cracks or combination breaks that have multiple types of damage present on the windshield surface. The appropriate repair method will depend on the size and severity of these damages.
It’s important to note that attempting DIY repairs on complex damages could lead to further complications or compromise your safety while driving. Therefore, seeking professional help is always recommended for such cases.
Remember that addressing any kind of windshield damage promptly is crucial for your safety on the road!
Factors to Consider Before Attempting Windshield Repair
Before you decide to tackle windshield repair on your own, there are a few important factors that you need to consider. First and foremost, you should assess the severity of the damage. Minor chips and cracks can often be repaired with a DIY kit, but larger or more extensive damage may require professional assistance.
Another factor to consider is your level of experience and skill in handling auto repairs. While DIY kits may seem straightforward, it’s essential to have a steady hand and understanding of the process before attempting any repairs. If you’re unsure about your abilities, it’s best to leave it to the professionals.
Additionally, take into account the time commitment required for repairing a windshield yourself. Depending on the size of the damage and your experience level, this task could take several hours or even longer. Consider whether you have enough time available and if this is something you’re willing to invest your energy into.
Furthermore, weather conditions play a significant role in successful windshield repair. Extreme temperatures can affect adhesion and curing times for resin used in repairs. It’s crucial to choose an appropriate day when temperatures are moderate for optimal results.
Evaluate whether attempting DIY repair would void any warranties or insurance coverage on your vehicle. Some policies may require professional repair services or have specific guidelines that must be followed.
By considering these factors beforehand, you can make an informed decision about whether tackling windshield repair yourself is the right choice for you
Necessary Tools and Materials for DIY Windshield Repair
When it comes to attempting windshield repair on your own, having the necessary tools and materials is crucial for a successful outcome. Here are some essential items you’ll need:
1. Windshield Repair Kit: Investing in a high-quality repair kit is the first step. These kits typically include resin, curing strips, adhesive tabs, and an applicator.
2. Safety Gloves and Eye Protection: Protecting yourself during the repair process is important. Wear gloves to shield your hands from any sharp edges or debris and use safety glasses to safeguard your eyes from flying particles.
3. Cleaning Supplies: Before starting the repair, thoroughly clean the damaged area with glass cleaner or a mixture of water and mild detergent. Use lint-free cloths or paper towels to avoid leaving behind any residue.
4. Razor Blade or Glass Scraper: To remove any loose glass fragments or old adhesive around the damaged area, use a razor blade or glass scraper carefully.
5. UV Light Source: A UV light source is needed to cure the resin once it’s applied onto the damaged windshield surface. This can be either sunlight (if working outdoors) or a UV lamp specifically designed for this purpose.
6. Plastic Film Strips: Transparent plastic film strips are used in conjunction with adhesive tabs to create suction over cracks while applying pressure during curing.
7. Clear Tape: Clear tape helps create an airtight seal over small chips before injecting resin into them for optimal results.
Having these tools at hand will make DIY windshield repairs easier and more efficient! Remember always follow proper guidelines when using these tools for your safety!
Step-by-Step Guide for a Successful Repair
When it comes to repairing a windshield, following a step-by-step guide can ensure a successful outcome. Here’s how you can tackle the task:
1. Assess the damage: Start by examining the size and type of damage on your windshield. Is it a small chip or crack? Understanding the extent of the problem will help determine which repair method to use.
2. Gather necessary tools: Before getting started, gather all the tools and materials needed for the repair process. This may include a windshield repair kit, resin, razor blade, cleaning solution, and cloths.
3. Clean the area: Thoroughly clean both sides of the damaged area using a glass cleaner or alcohol-based solution. Remove any debris or dirt that could interfere with proper adhesion during repair.
4. Apply resin: Next, carefully follow the instructions provided with your windshield repair kit to apply resin onto the damaged area. Use an applicator tool to spread and fill in any cracks or chips.
5. Allow curing time: Once you’ve applied resin, allow sufficient time for it to cure properly according to manufacturer guidelines before proceeding further.
6. Polish and smooth: After curing is complete, use a razor blade or similar tool to remove excess resin from above the surface of your windshield carefully. Then use polishing compound for finishing touches.
7. Check results: Finally inspect your work closely under different lighting conditions to ensure that there are no visible defects remaining after completing repairs.
Remember that this step-by-step guide is intended as general advice only; always refer to specific instructions provided with your chosen repair kit for best results.
Precautions to Take After Repairing a Windshield
After successfully repairing your windshield, there are a few precautions you should take to ensure the longevity of the repair and maintain your safety on the road.
Avoid washing your car for at least 24 hours after the repair to allow the adhesive used in the process to fully cure. Water or cleaning products can interfere with this process and compromise the effectiveness of the repair.
Additionally, it’s important to avoid driving over speed bumps or rough terrain immediately after repairing your windshield. The vibrations caused by these uneven surfaces can disrupt the newly repaired area and potentially undo all your hard work.
Furthermore, be cautious when opening and closing car doors as excessive force could put pressure on the repaired section and weaken its integrity. Take extra care not to slam doors shut or place heavy items near where repairs have been made.
In addition, try to park in shaded areas whenever possible as prolonged exposure to direct sunlight can cause stress on newly repaired windshields. Extreme temperatures can also affect adhesives used in repairs, so opting for shaded parking spots is a simple precautionary measure.
If you notice any issues with visibility or further damage occurring after repair, don’t hesitate to seek professional help. It’s better to address any concerns promptly rather than risking more significant damage down the line.
By following these precautions carefully, you’ll be able to enjoy a properly repaired windshield that maintains its strength and clarity while keeping you safe during your travels. Remember that prevention is always better than having to fix something twice!
When to Seek Professional Help
When it comes to windshield repair, there may come a time when seeking professional help is the best course of action. While DIY repairs can save you money and be successful in some cases, there are certain situations where the expertise of a professional is invaluable.
One important factor to consider is the severity of the damage. If you have a small chip or crack that has not spread beyond a certain size, DIY repair kits may be sufficient. However, if the damage is extensive or has compromised the structural integrity of your windshield, it’s time to call in professionals.
Another consideration is your level of experience and confidence with DIY repairs. While many people are able to successfully fix minor damages themselves, attempting more complex repairs without proper knowledge can lead to further damage and even safety risks.
Additionally, if you lack access to necessary tools and materials for repairing windshields, it’s best to leave it to professionals who already have everything they need on hand. Specialized equipment and high-quality resins are vital for ensuring long-lasting results.
If you’ve attempted DIY repairs but haven’t achieved satisfactory outcomes or if the damage continues to worsen despite your efforts, it’s time to seek professional help. They have the expertise and resources needed to properly assess and address any issues with your windshield.
Remember that when it comes to your vehicle’s safety features, such as its windshield which provides structural support during accidents or collisions – leaving things in capable hands ensures peace of mind while on the road
Conclusion
Repairing a damaged windshield is not a task to be taken lightly. It requires careful consideration, the right tools and materials, and in some cases, the expertise of a professional. By understanding the importance of fixing a damaged windshield, weighing the pros and cons of DIY versus professional repair services, knowing the different types of damage and their repair options, considering important factors before attempting repairs, having the necessary tools and materials on hand, following a step-by-step guide for success, taking precautions after repairing your windshield, and knowing when it’s time to seek professional help – you can make an informed decision about how best to address your windshield damage.
Remember that safety should always be your top priority. A cracked or chipped windshield can compromise its structural integrity and put you at risk in case of an accident. Whether you choose to tackle the repair yourself or enlist the help of professionals will depend on various factors such as your level of confidence in DIY projects, the extent of damage to your windshield, and any specific requirements set by your insurance provider.
If you do decide to go down the DIY route for minor damages like small chips or cracks under six inches long using kits designed for this purpose may be worth considering. However,
for more extensive damage or if you are unsure about how best to proceed with repairs it is advisable to consult with professionals who have experience working with windshields.
Ultimately though getting prompt attention from either yourself or professionals is key when it comes addressing issues related to windshields since neglecting them could lead larger problems down road which might prove costly both financially
and ensuring safety while driving.
No matter which option you choose remember that proper maintenance plays an essential role in preserving vehicle longevity
and keeping occupants safe.
So don’t ignore those tiny chips or cracks! Take action today!
Now that we’ve covered everything you need know before attempting windshield repair,
it’s time for you get started on fixing that damaged glass and getting back on the road with confidence. Happy repairing!